Introduction
What’s this?
Noronha is a framework that hosts Machine Learning projects inside a portable, ready-to-use DataOps architecture. The goal here is to help Data Scientists benefit from DataOps practices without having to change much of their usual work behavior.
Overview
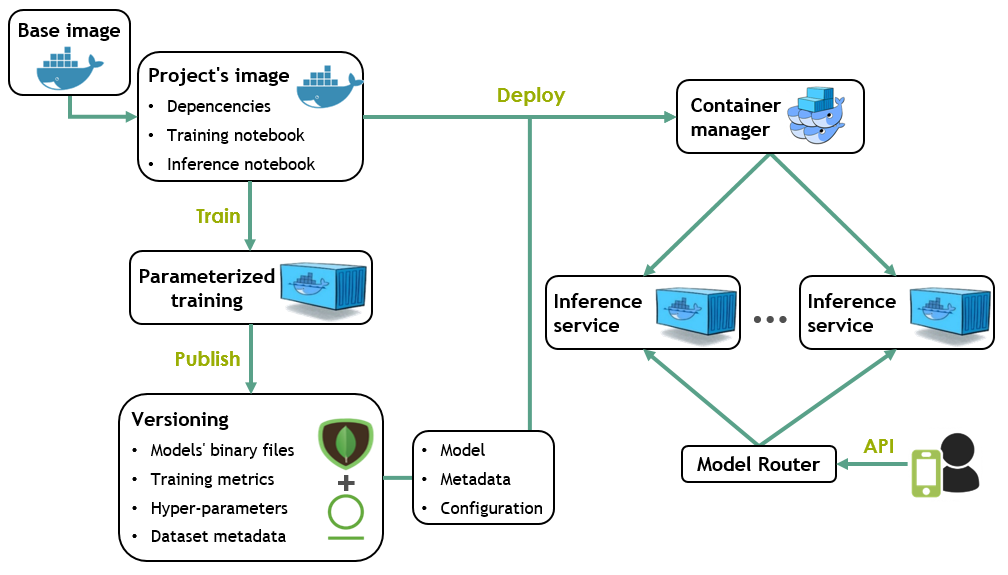
The following steps and the diagram bellow describe together the basic training and deploying workflow of a Machine Learning project inside Noronha:
Noronha’s base image is used as a starting point to provide the tools a project needs to run inside the framework.
The project is packed in a Docker image with its dependencies, a training notebook and a notebook for inference.
Every training is a parameterized execution of the training notebook, inside a container of the project’s image.
Every model version produced is published to a versioning system in which MongoDB stores metadata and a file manager like Artifactory stores raw files and binaries.
When deploying a model, containers of the project’s image are created for running the inference notebook as a service. Every asset necessary is injected into the containers.
Pre-requisites
To use Noronha in its most basic configuration all you need is:
Any recent, stable Unix OS.
Docker v17+ with Swarm mode enabled and configured to be used without sudo.
A Conda v4.5+ environment with Python v3.5+.
For a more advanced usage of the framework, see the configuration guide.
Installation
You can easily install Noronha by activating your Conda environment and running the following commands:
pip install noronha-dataops

nha get-me-started
This assumes you’re going to use the default plugins (MongoDB and Artifactory) in native mode (auto-generated instances). To use plugins differently, see the configuration guide.
Basic usage
Let’s start with the simplest project structure:
project_home:
+-- Dockerfile
+-- requirements.txt
This is what the Dockerfile may look like:
# default public base image for working inside Noronha
FROM noronhadataops/noronha:latest

# project dependencies installation
ADD requirements.txt .
RUN bash -c "source ${CONDA_HOME}/bin/activate ${CONDA_VENV}  && conda install --file requirements.txt"

# deploying the project's code
ADD . ${APP_HOME}
Now record your project’s metadata and build it:
nha proj new --name my-proj
nha proj build --tag develop
Then, run the Jupyter Notebook interface inside your project’s image for editing and testing code:
nha note --edit --tag develop
For fully-working project templates and end-to-end tutorials, see the examples directory.